How to Propagate Monstera Deliciosa: Nodes, Cuttings and Layering
A monstera cutting needs a piece of stem with a node, not just a leaf and its stalk. Learn how to read the stem, where to cut, how to root the cutting in water or moss, and when air layering is the gentler choice.
At a glance
What you need
- Clean sharp knife or pruners
- Rubbing alcohol for the blades
- Gloves
- Tall stable vase or jar
- Sphagnum moss or airy rooting mix
- Stake or support for the leaf
Rooting speed varies by plant, season and conditions.
Cutting into a large monstera feels like a bigger decision than snipping a trailing vine. The leaves are few, each one took a long time to grow, and a cut in the wrong place can leave you with a leaf in a vase that never becomes a plant.
The key to how to propagate monstera is the stem, not the leaf. This guide to Monstera deliciosa covers the methods that suit it, the popular one that does not work, and how to read the stem so every cutting you take has what it needs to grow.
Methods that suit monstera, and one that does not
Two methods suit this plant:
- Stem cuttings that include at least one node. This can be a tip cutting with one or two leaves, or a single-node section cut from further down the stem.
- Air layering. You wrap a node and its aerial root in damp sphagnum moss while the stem is still attached to the plant, and cut only once roots have grown into the moss.
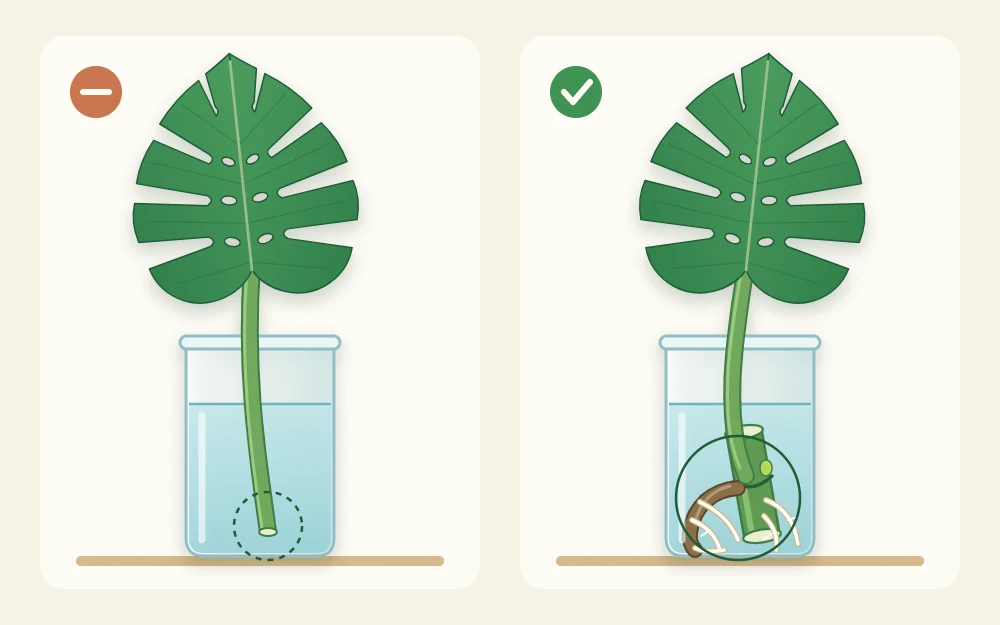
What does not work is a leaf and its long stalk cut off without any stem. The stalk is a petiole, and it carries no bud. A leaf like this can stay green in a vase for a long time and may even form roots, but it has nothing to grow a new shoot from, so it will not become a plant.
Division is not a general method for monstera either. It only applies when a pot holds several separate stems, each with its own roots, which can be untangled and potted individually.
Read the stem before you cut
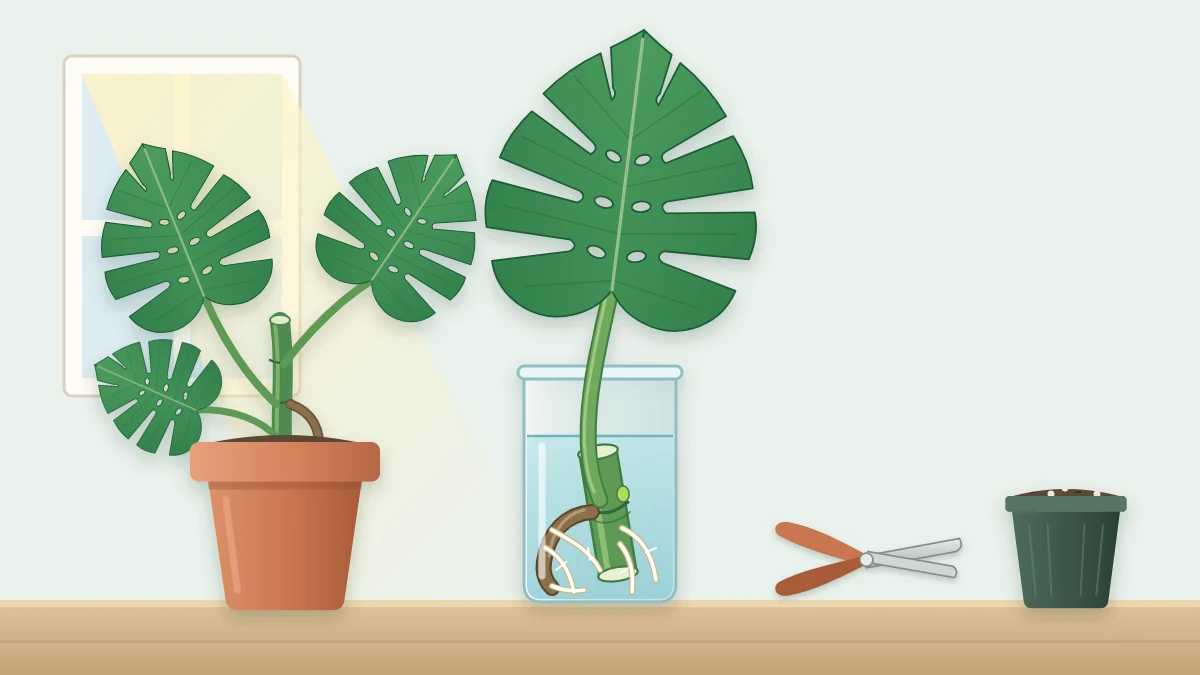
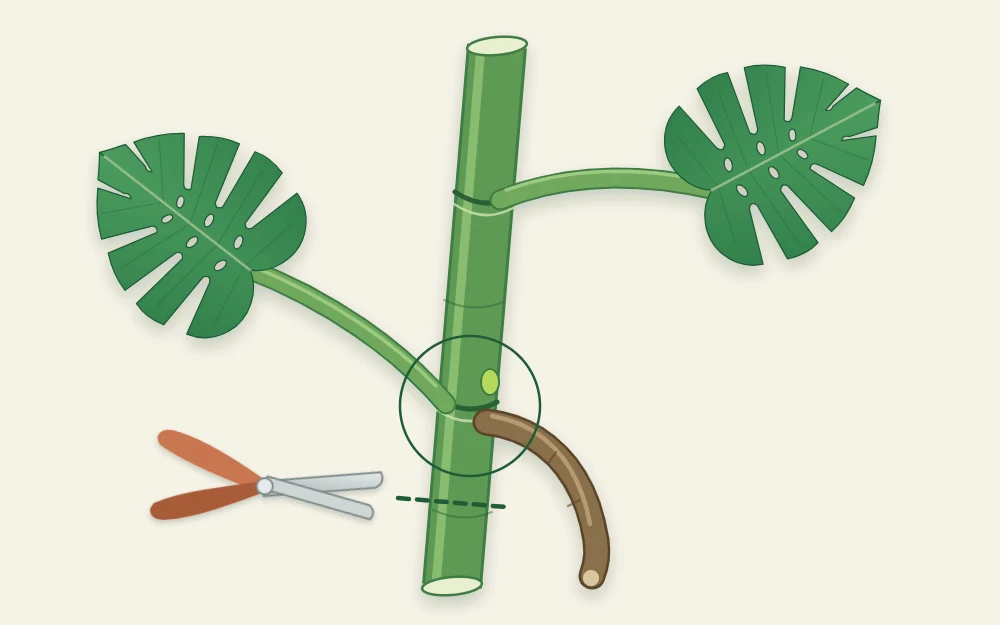
Push the leaves aside and find the thick main stem. It is the part that climbs or sprawls, and the leaf stalks attach to it. Each node shows as a ring around the stem where a leaf attaches. There is usually a thick brown aerial root growing from the stem beside it, and a small bud bump, which is where the new shoot will come from.
Your cutting needs that ring and bud, and ideally the aerial root too. For more help recognizing them, see the guide to finding a plant node.
Take a stem cutting
- Choose a section with a healthy leaf, a clear node and, if possible, an aerial root.
- Clean a sharp knife or pruners. Rubbing alcohol on the blades is a method extension services commonly describe.
- Cut the stem a little below the node, about 1 in (2.5 cm) under it, in one clean pass. Keep the aerial root attached to the cutting.
- Let the large cut surface dry briefly, until it no longer looks wet, before it goes into water or a rooting medium.
- Support the leaf. A monstera leaf is heavy and will tip a cutting over, so use a tall, stable container or a stake.
Good to know
The ASPCA lists this plant, under the name cutleaf philodendron, as toxic to dogs and cats; see the ASPCA entry for cutleaf philodendron. Its sap can irritate skin, so gloves are sensible when you cut, and trimmings should be kept away from pets.
Root the cutting in water, moss or mix
In water
Stand the cutting in a tall vase or jar of room-temperature water with the node and aerial root submerged and the leaf well out of the water. Refresh the water every few days or when it turns cloudy. New white roots often branch from the aerial root as well as from the node. The broader method is described in how to propagate plants in water.
In damp moss or an airy mix
Set the node and aerial root into damp sphagnum moss, or into a chunky, airy rooting mix with plenty of perlite, in a pot just large enough to hold the cutting steady. Keep the medium evenly moist, like a wrung-out sponge, and never soggy. A large cut stem that sits wet is prone to rot.
In either case, place the cutting in bright indirect light and in a warm room. Rooting hormone is optional. If you use one, read and follow the product label.
Air layering for a lower-risk start
If you would rather not cut until roots exist, air layering suits monstera well because the nodes already carry aerial roots. Wrap a handful of damp sphagnum moss around a node and its aerial root, cover the moss with clear plastic and tie it loosely at both ends. Keep the moss damp. When you can see roots through the plastic, cut the stem below the wrapped node and pot the new plant up, moss and all.
The leaf stays fed by the parent plant the whole time, which is why this method is gentler on big cuttings. The full step-by-step is in the guide to air layering houseplants.
Leafless stem sections
If you shorten a long, leggy stem, the bare sections do not have to be thrown away. A leafless piece of stem with a node can also sprout. Lay it on damp moss or airy mix with the bud facing up and keep it warm and lightly moist.
These sections are slower than cuttings with a leaf, because there is no leaf to supply energy. A piece that stays firm is still worth keeping. One that turns soft and dark has failed.
What happens to the parent plant
The parent is not finished after you cut it. It regrows from a node below the cut, where a bud breaks and forms a new growing point.
Leave the parent at least one healthy leaf if you can, so it has the means to push that new growth.
What to expect while you wait
Large cuttings are slow to adjust, and there is no fixed timeline. Speed depends on warmth, light, the season and how vigorous the parent was. Judge progress by what you can see: firm stem, white roots that lengthen and begin to branch, and eventually a new leaf emerging from the bud.
A leaf may droop or yellow slightly at first while the cutting has few roots. That has several possible causes, including low light and cold, so check the conditions before assuming the cutting is lost. Some cuttings do fail, and a plant with a long stem gives you room to try again.
Frequently asked questions
Can a monstera leaf without a node grow into a plant?
No. A leaf cut off with only its long stalk has no bud, so it cannot produce a new shoot. It may stay green in water and can even grow roots, which is why the mistake is so common. A new plant needs a piece of the main stem that includes a node.
Does a monstera cutting need an aerial root?
It needs a node. An aerial root is a helpful extra, because new water roots often branch from it, but a stem section with a node and no aerial root can still root and sprout. Where you have a choice, pick a node that already has one and keep it attached.
Will the parent monstera grow back after a cutting is taken?
Usually, yes. The parent regrows from a node below the cut, where a bud opens and becomes the new growing point. The plant will look shortened until that shoot grows on. Leaving at least one healthy leaf on the parent helps it recover.