How to Propagate a ZZ Plant: Division and Leaf Cuttings
A ZZ plant grows from underground rhizomes, which is why division is the quickest way to a second plant. Stalk and leaflet cuttings also work but are very slow. Here is how to do each and what to look for.

At a glance
What you need
- Clean sharp knife or snips
- Gloves
- Fast-draining potting mix
- Small pots or a shallow tray with drainage
- Tall glass and room-temperature water
Rooting speed varies by plant, season and conditions.
The ZZ plant has a reputation for being slow to multiply, and the reputation is fair. It is one of the slowest common houseplants to propagate. It is also very forgiving of being left alone, which is most of what its cuttings ask for.
Before looking at how to propagate a ZZ plant (Zamioculcas zamiifolia), it helps to understand how the plant is built, because its structure decides which methods make sense. This guide explains that structure, then covers division, whole-stalk cuttings and single leaflet cuttings.
How a ZZ plant is built
What look like stems on a ZZ plant are not stems. Each upright stalk is one large compound leaf, and the small glossy “leaves” along it are leaflets. The true stems are below the soil: rounded, potato-like rhizomes that store water, with roots growing from them.
Two things follow from this. First, there is no vine or branch with nodes along it, so you are never looking for a node. Second, a plant designed to store water in a rhizome rots easily when kept wet, and that shapes how you treat every division and cutting. For more on the plant itself, see the NC State Extension profile of ZZ plant.
Methods that suit a ZZ plant, and what does not
Three methods suit it:
- Division of the rhizomes, the quickest way to a full plant.
- Whole-stalk cuttings, rooted in water or in mix.
- Single leaflet cuttings, set a little way into barely moist mix.
What does not suit it is the node cutting used for vining plants such as pothos. A ZZ stalk is a leaf, not a stem, and has no nodes, so the rule of cutting just below a node does not apply here. The plant also does not suit the constantly moist conditions that leafy cuttings are given: ZZ cuttings kept wet tend to rot.
Divide the rhizomes for the fastest result
- Slide the plant out of its pot and brush away enough mix to see the rhizomes.
- Look for natural gaps between clusters. Gently pull them apart, or cut between them with a clean knife, so each piece has at least one leaf stalk and some roots.
- Let any cut surfaces dry briefly, until they no longer look wet.
- Pot each piece in fast-draining mix, with the rhizome just below the surface, in a pot only slightly wider than the piece.
- Water lightly, then let the mix dry well before watering again.
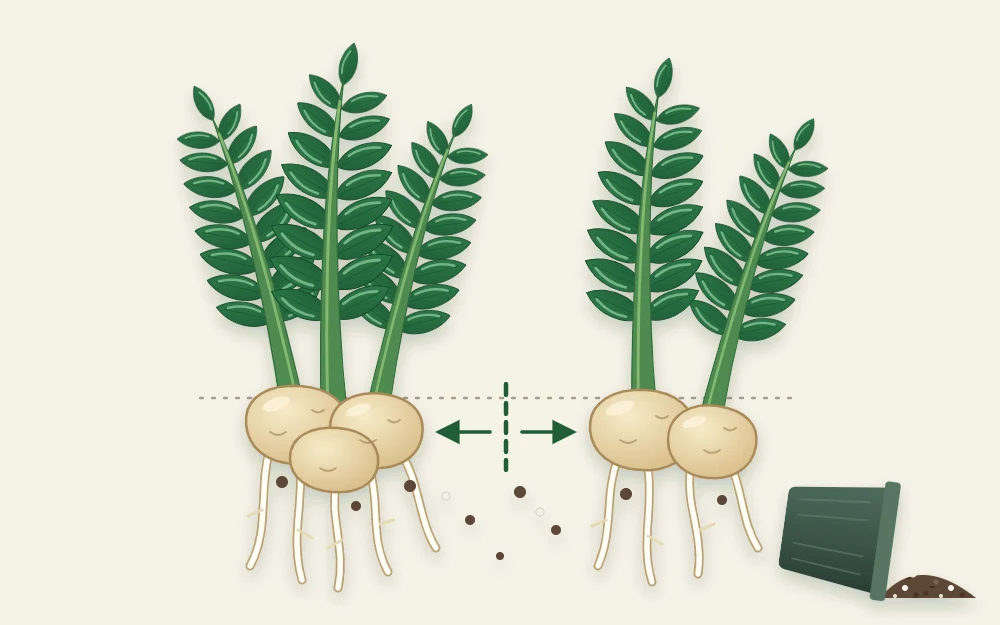
A division already has rhizome, roots and leaves, so it is a working plant from the first day. The general technique for unpotting and splitting is covered in how to divide houseplants.
Good to know
All parts of the plant contain calcium oxalate crystals, and the sap can irritate skin. Wear gloves when you cut or divide it and wash your tools afterward. Before keeping any plant where pets chew, check the ASPCA plant list.
Take a whole-stalk cutting
If you do not want to unpot the plant, cut one stalk near its base with clean snips. Let the cut end dry briefly.
- In water: stand the stalk in a tall glass with the bottom 1 to 2 in (2.5 to 5 cm) submerged and the leaflets clear of the water. Replace the water every few days or when it looks cloudy.
- In mix: set the cut end into barely moist, fast-draining mix, deep enough for the stalk to stand, and support it if it leans.
Water lets you see what is happening at the base. Mix avoids a later move from water to a pot. In both, a tall stalk is top-heavy, so choose a container that will not tip.
Root single leaflets
One stalk carries many leaflets, and each can become a plant, though this is the slowest route of the three.
- Remove healthy leaflets from a stalk, keeping the short base of each where it joined the stalk.
- Let them sit for a few hours so the cut ends dry.
- Fill a shallow tray or pot with fast-draining mix and moisten it so it is barely damp.
- Set each leaflet upright with its cut end a little way into the mix, about 1/2 in (1 cm) deep, leaving most of the blade exposed.
- Keep the mix barely moist, never wet.

Start more leaflets than you need. Some will fail, and extras cost the plant very little.
What happens underground, and why it looks like nothing
With both kinds of cutting, the plant works in a set order. First it forms a small swollen rhizome and roots at the base. Only later does that new rhizome send up a shoot. From above, the cutting can look unchanged for a very long time.
No timeframe is honest here. Progress depends on warmth, light, the season and the vigor of the parent plant, and it is slow even when all of those are favorable. The useful test is condition: a leaflet or stalk that is still green and firm is still working. One that turns yellow and soft, or dark at the base, has failed.
Resist digging cuttings up to check. If the wait is making you doubt the whole attempt, the checklist for cuttings that are not rooting helps separate a slow cutting from a stalled one.
Keep cuttings warm, bright and on the dry side
ZZ cuttings need three things while they wait:
- Warmth. A warm room, away from cold windowsills and drafts.
- Bright indirect light. Enough for the leaflets to keep feeding the developing rhizome, without direct sun.
- Much less moisture than leafy cuttings. Let the mix become nearly dry between light waterings. Because the plant is built to store water, it rots if kept wet.
Rooting hormone is optional and may help with slow-rooting plants, but it does not change the need for patience. If you use one, read and follow the product label.
The same dry, unhurried approach applies to another plant with underground storage. The guide on propagating a snake plant by division or leaf cuttings makes a useful comparison.
Frequently asked questions
What is the fastest way to propagate a ZZ plant?
Division. Each piece you separate already has a rhizome, roots and at least one leaf stalk, so it is a complete plant as soon as it is potted. Stalk and leaflet cuttings have to build a new rhizome and roots from nothing before any shoot can appear, which is much slower.
Can a ZZ plant grow from a single leaflet?
Yes. A healthy leaflet set a little way into barely moist, fast-draining mix can form a small rhizome and roots at its base, and later a shoot. It is the slowest method, and not every leaflet succeeds, so start several. A leaflet that stays green and firm is still making progress.
Why does a ZZ cutting look the same after a long wait?
Because the early work is hidden. The cutting first forms a small swollen rhizome and roots at its base, and only later sends up a shoot. Nothing shows above the surface during that stage. As long as the cutting is green and firm, keep it warm, bright and fairly dry.