How to Propagate a Spider Plant From Plantlets
Spider plant babies root readily when you pick ones with root nubs at the base. Here are three ways to root them, how to divide a crowded clump, and why some plants make no plantlets.

At a glance
What you need
- Clean scissors
- Small pots with drainage holes
- Potting mix
- Small glass and room-temperature water
- Bent paper clip or wire for pinning
Rooting speed varies by plant, season and conditions.
A mature spider plant does much of the propagation work for you. It sends out long arching stems, and small complete plants form along them, each a miniature of the parent waiting for something to root into.
That makes learning how to propagate a spider plant (Chlorophytum comosum) mostly a matter of choosing which babies to pot and which of three simple ways to root them. This guide covers those three ways, division of a crowded clump, and what it means when a plant makes no babies at all.
Methods that suit a spider plant, and those that do not
Two methods suit this plant:
- Plantlets, the small plants that form on the long flower stems. They can be rooted while still attached, in water, or directly in mix.
- Division of a mature, crowded clump, which has thick, white, fleshy roots.
Leaf and stem cuttings do not suit it. A single strap leaf cut from a spider plant will not root into a new plant, in water or in mix, because it has no crown to grow from. The long stems that carry the babies are not used as cuttings either: it is the plantlet at the end that roots, not the stem.
For how this kind of growth works in other plants too, see the guide to plantlets and runners.
Choose plantlets that are ready
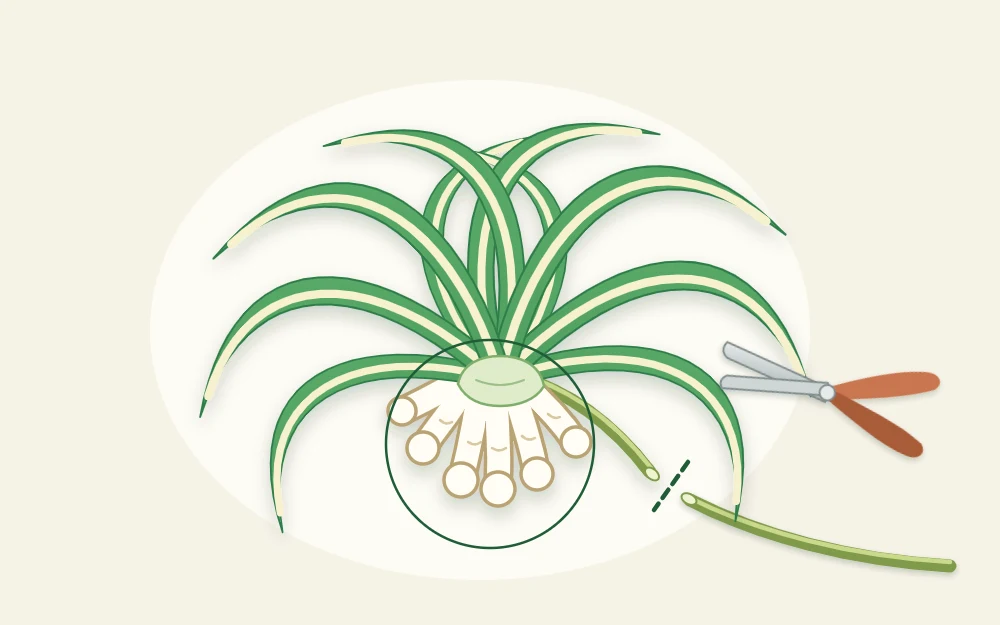
Turn a plantlet over and look at its base. The ones that are ready have small, knobby root nubs there, pale and blunt, sometimes already a little elongated. A plantlet with a decent rosette of leaves and visible nubs has what it needs.
Very small plantlets with a smooth base are better left on the parent to develop further. There is no need to remove them all at once, so you can take the most advanced ones first.
Three ways to root a plantlet
1. Pin it down while still attached
- Fill a small pot with moist potting mix and set it beside the parent plant.
- Rest the base of the plantlet on the surface and press it in lightly so the root nubs touch the mix.
- Hold it in place with a bent paper clip or a piece of wire over the stem.
- Keep the mix evenly moist. Cut the connecting stem once the plantlet is anchored and growing new leaves.
This is the gentlest option, because the parent keeps feeding the plantlet until its own roots take over.
2. Snip and stand it in shallow water
- Cut the stem close to the plantlet with clean scissors.
- Stand the base in a small glass with just enough water to cover the root nubs. Keep the leaves dry and above the rim.
- Refresh the water every few days or when it looks cloudy.
- Pot it into moist mix once the roots have lengthened and begun to branch.
Spider plant is one of several houseplants that root in water, and a narrow-necked glass makes it easy to hold the leaves clear.
3. Snip and plant straight into mix
- Cut the plantlet from its stem.
- Make a shallow dip in a small pot of moist mix and set the base in so the root nubs are covered and the leaves sit above the surface.
- Firm the mix gently and keep it evenly moist, like a wrung-out sponge, while roots form.
With all three, place the pots or glass in bright indirect light. You will know a plantlet has rooted when it resists a very light tug and starts to produce new leaves from the center. Rooting hormone is not needed for spider plant plantlets.
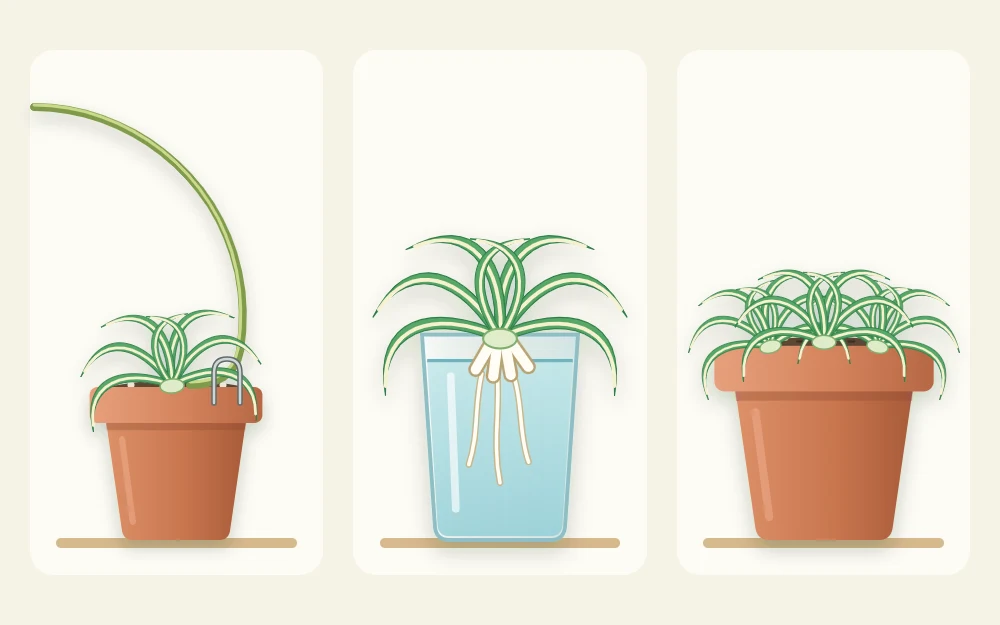
Plant several together for a full pot
One plantlet in a pot looks sparse for a long time. Planting three or so to a pot, spaced evenly, gives a fuller look much sooner, since each one grows into its own rosette and the leaves overlap.
Use a pot that is modest in size for the group. A small root system in a large volume of mix stays wet for longer than it should.
Divide a crowded clump
An older spider plant often fills its pot with thick, white, fleshy roots, and the crown separates naturally into several growing points. That is a good candidate for division.
- Slide the plant out of its pot. Tightly packed roots may need a knife run around the inside edge.
- Find the natural gaps between clusters of leaves.
- Pull the crown apart with your hands, or cut through it with a clean knife, so each section has roots and leaves.
- Pot each section in fresh mix at the same depth as before, and water it in.
Some of the fleshy roots will break, which is expected. The general method, including how many pieces to aim for, is covered in how to divide houseplants.
If your plant makes no plantlets
A spider plant without babies is not faulty. It is often young, recently repotted into a large pot, or short of light, and more than one of these can apply. A plant that is still filling a roomy pot with roots tends to put its energy there first.
If you want a new plant now, division does not depend on plantlets at all. Otherwise, a brighter spot with indirect light and some patience are the usual answers. For background on the plant and its habit, see University of Wisconsin Extension on spider plant.
Brown tips and other small worries
Brown leaf tips on babies are common and usually cosmetic. They have several possible causes and do not, on their own, mean a plantlet is failing. Judge a plantlet by its center instead: firm new leaves emerging from the middle are the sign that matters.
A plantlet whose base turns soft and dark has rotted and should be discarded. That is most often associated with a base kept too deep in water or in soggy mix. Some plantlets fail even with good care, and a healthy parent usually offers plenty of spares.
Good to know
The ASPCA lists spider plant as non-toxic to dogs and cats; see the ASPCA entry for spider plant. That listing is not the same as edible, so dangling plantlets are still best kept away from pets that like to chew.
Frequently asked questions
Should spider plant babies be rooted in water or in soil?
Either suits them. Water lets you watch the roots lengthen, but the plantlet then has to adjust to mix. Planting straight into moist mix, or pinning the plantlet to a pot while it is still attached to the parent, avoids that move. Choose plantlets that already have root nubs at the base.
Can a spider plant be grown from a single leaf?
No. A strap leaf cut from a spider plant has no crown or growing point, so it will not root into a new plant in water or in mix. New plants come from the plantlets that form on the long arching stems, or from dividing a mature clump into sections with roots.
Do the babies have to be removed from a spider plant?
No. Plantlets can stay on the parent, and many people leave them for the look. Remove them when you want new plants or the display is getting crowded. Taking the most developed ones first, those with clear root nubs, gives the smaller ones more time on the parent.