Air Layering Houseplants: Rooting a Stem Before You Cut It
Air layering makes roots form on a stem while it is still attached to the parent. Here is which thick-stemmed houseplants it suits, how to wound and wrap the stem, and when to cut.
At a glance
What you need
- Clean sharp knife
- Damp sphagnum moss
- Clear plastic wrap
- Soft ties or twine
- Toothpick
- Gloves
- Stake
Rooting speed varies by plant, season and conditions.
A tall rubber plant with three leaves at the top and a long bare stem below is a common sight, and a hard one to fix with ordinary cuttings. A thick, woody piece of stem with large leaves often struggles to stay alive long enough to root once it has been cut off.
Air layering houseplants gets around that problem by reversing the order. You make roots form on the stem while it is still attached to the parent plant, and only then cut below the new roots. The top keeps receiving water from the parent the whole time.
Which plants suit air layering
The method suits thick or woody-stemmed houseplants that are slow from cuttings or have become leggy, such as:
- Rubber plant and fiddle-leaf fig
- Dracaena
- Croton
- Schefflera
- Dieffenbachia
It is also used on climbing aroids such as monstera, in a simpler form. There, an existing node with an aerial root is wrapped in damp moss, with no wound needed, and the stem is cut once that root has branched into the moss. The guide on propagating monstera explains where the nodes are on that plant.
When it is not the right method
Air layering is not needed for easy vines. Pothos, heartleaf philodendron and tradescantia root readily from ordinary cuttings, and wrapping their thin stems is extra work for no gain. See the types of stem cuttings for those plants.
It is also not possible on stemless, clumping plants. Peace lily, ferns and snake plant have no length of stem above the soil to wrap, and they are divided instead.
What you need
- A clean, sharp knife
- Sphagnum moss, soaked and then squeezed out
- A piece of clear plastic, such as a cut-open bag or food wrap
- Soft ties, twine or tape for both ends
- A toothpick
- Gloves, if you are working with a ficus or dieffenbachia
Sphagnum moss is used because it holds a lot of water while staying airy, which is what new roots need. You can read more about it in the guide to rooting media for cuttings.
Good to know
Rubber plant and fiddle-leaf fig bleed a milky sap when cut, and it can irritate skin. Wear gloves, wipe the cut with a damp cloth until the flow slows, and protect the floor underneath.
How to air layer a woody stem
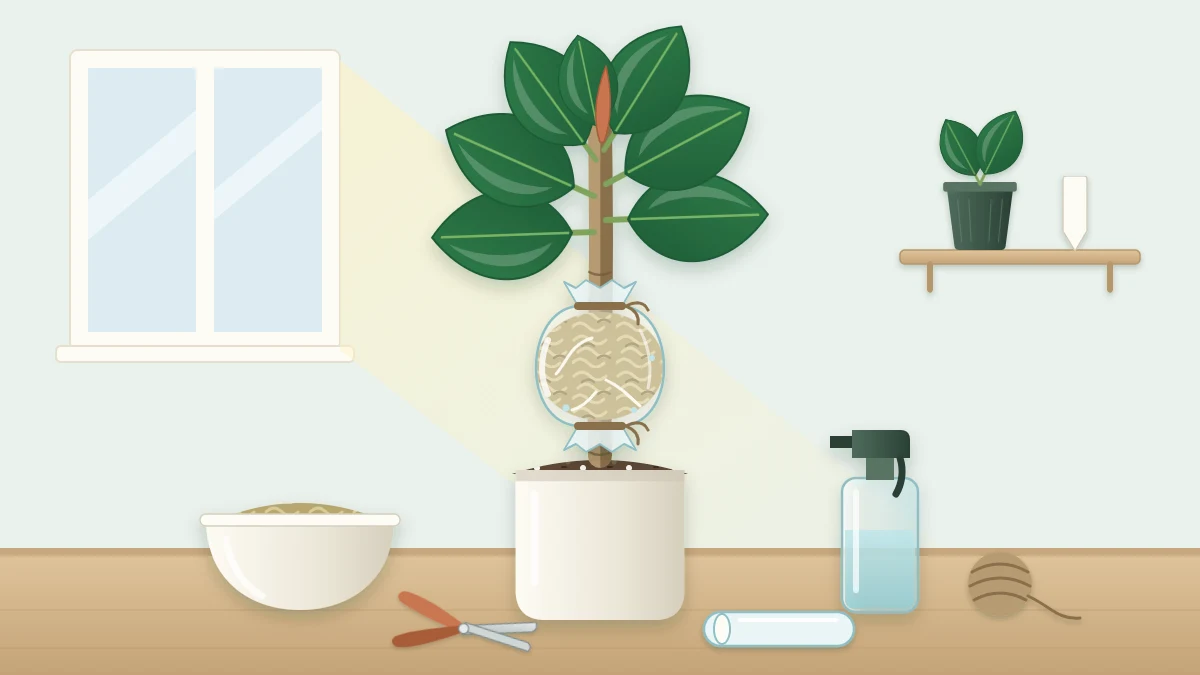
- Choose the spot. Pick a point just below a node on healthy stem, where you would like the new plant’s roots to be. Leave a good length of leafy stem above it, and remove any leaf that is in the way of the wrap.
- Wound the stem. Make a shallow, upward-slanting cut about a third of the way through the stem, and prop it open with a toothpick so it cannot close and heal. The alternative is to remove a narrow ring of bark all the way around the stem. Either wound interrupts the flow down the stem at that point, and roots tend to form just above it.
- Add rooting hormone if you wish. Dusting the wound is optional. It may help with plants that are slow to root; read and follow the product label.
- Pack on the moss. Take a generous handful of damp sphagnum moss, about the size of a fist, and press it around the wound so it covers the stem on every side. The moss should be damp, not dripping.
- Wrap it. Fold the clear plastic around the moss and tie it firmly at both ends, so the bundle stays in place and the moisture stays in.
- Support the stem if needed. A stem cut a third of the way through is weaker than it was. A stake tied above and below the wrap keeps a top-heavy plant from snapping.

Looking after the wrap
Keep the plant where it was, in bright indirect light, and care for it as usual. Direct sun on the plastic can overheat the bundle, so shade the wrap if the sun reaches it.
Check the moss now and then. It should stay damp and keep its color; if it turns pale and dry, loosen the top tie, add a little water and tie it again. If water pools in the bottom of the wrap, the moss is too wet, and letting some drain out is the safer choice.
Air layering can be slow, and timing varies widely with the plant, the season and the warmth of the room. Some layers show roots within several weeks during warm, bright months, while others can sit for many months before anything is visible. There is nothing to do in the meantime except keep the moss damp.
When and how to separate the new plant
The clear plastic is there so you can see what is happening without unwrapping. Wait until roots are clearly visible through it and have filled out the moss, not just until the first root tip appears. A single thin root is not enough to support a leafy top.
- Cut straight through the stem just below the new roots with a clean, sharp blade.
- Remove the plastic and ties. Leave the moss on the roots; pulling it away breaks them.
- Pot the new plant in fresh, evenly moist mix, in a pot only a little wider than the root ball, and stake it if it leans.
- Keep it in bright indirect light and out of direct sun while it settles. The mix should stay evenly moist, never soggy.

What happens to the parent plant
The parent is left as a shorter, bare stem, which can look alarming at first. Keep caring for it. The stem usually sprouts below the cut, often with one or more new shoots near the top, and in time it becomes a shorter and bushier plant than before.
If the layer does not root
Not every air layer succeeds. If months pass with no sign of roots, open the wrap and look. Several things can be behind it:
- The cut has closed and healed over, which is why it is propped open at the start.
- The moss dried out, or stayed so wet that the stem began to soften.
- The plant was not in active growth. Layers started in spring and summer generally respond better than those started in winter.
If the stem is still firm and healthy, you can refresh the moss and wrap it again, or start a new layer a little lower down.
Frequently asked questions
How do I know when an air layer is ready to cut?
Look through the clear plastic. The layer is ready when roots are clearly visible in several places and have filled out the moss, not when the first root tip shows. Cutting too early leaves a leafy top with too few roots to supply it, so waiting longer is the safer choice.
Do I need rooting hormone for air layering?
No, it is optional. Rooting hormone may help with plants that are slow or hard to root, and some growers dust it on the wound before packing on the moss. Many air layers are made without it. If you use a product, read and follow its label.
Can I air layer a pothos or a peace lily?
It is not the right method for either. Pothos and similar vines root readily from ordinary stem cuttings, so wrapping the stem is unnecessary work. Peace lily grows from a crown at soil level and has no stem to wrap, so it is divided instead.